These days, with the release of the European system and God Blue firmware, the bricks are also growing up, such as Ding Le as the LOGO, progress bar a few seconds away and so on, it seems necessary to write a tutorial to save the bricks.
Friendship Tip: If you are directly from the V37, V39 brush blue God personal test firmware package caused by the Ding Le LOGO or progress bar seconds to go, etc., please try to brush the official V054 firmware, there may be a miracle; If the fault still looks down.
Strong brush mode
1. Turn the music box off and unplug the power cord behind the box.
2. Then insert the U disk.
3. Hold down the power button for a long time and connect the power supply to the LeEr box with the other hand. When you see "Upgrade, do not power off," you can let go and wait for the brush machine to finish.
Do not power off during the upgrade. After the upgrade is complete, restart the desktop. You need to wait for a while to complete the initialization.
Brush Pack download address: music box C1s
Short recovery mode Â
Tutorial (Please carefully look at each step)
First, use the SD card (the SD card must be used) to create the boot card tool, and load the Bin file to make the SD card system disk.
Tip: The startup disk creation file must be in the same directory as u-boot.bin, otherwise the production will not be successful.
Instructions for use of this tool:
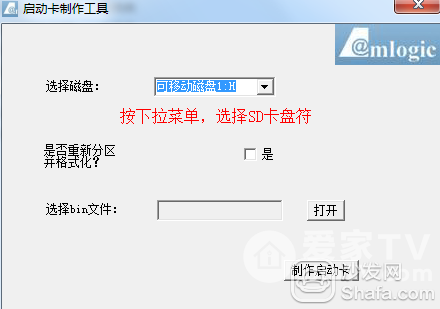
1. Prepare an SD card that will be used as a boot card and connect it to your computer with a card reader.
2. The boot disk creation tool SDcardMaker and u-boot.bin are placed in the same directory on the computer disk (put the computer system D disk, etc.). Run this tool SDcardMaker .

3. Select the disk you want to make the boot card in the drop-down box for "Select Disk". (If the drop-down list is empty, check if the removable disk has displayed the drive letter in "My Computer". If there is a drive letter, close this tool and run this tool again). See below
4. In the “Does Repartition and Format?†item, select “Yes†to repartition the corresponding disk. The default is U-BOOT, and other information reserves 16M disk space, and all remaining disks Space is divided into a zone, and the partition is formatted by calling the windows format window; then open and select the bin file. See below
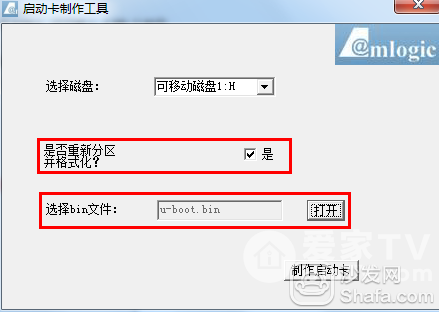
5, click on the production start card, you need to format the SD card, follow the prompts.
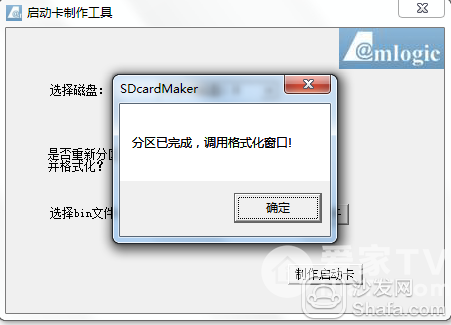 Start formatting
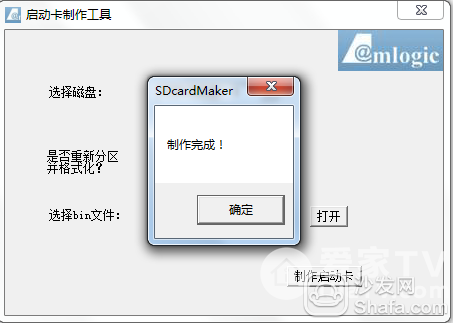
SD boot card production completed
Second, then the factory_update_param.aml, recovery.img, update.zip 3 files, copied to the boot card to create a good root directory.
Third, brush machine method:
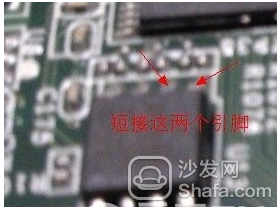
1, short circuit (shorted) and power (short circuit 5 seconds)
Tip: short circuit with the metal object as shown in the FLASH 5,6 pin, and then power on the box 3-5 seconds, in the short-circuited metal objects away, when the robot appears to enter the save brick mode.
Short-circuit icon
 Short-circuit as shown
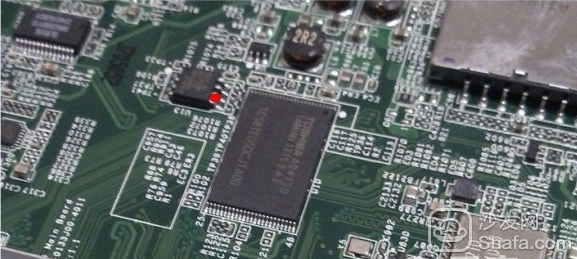 Short-circuit the red dot as shown
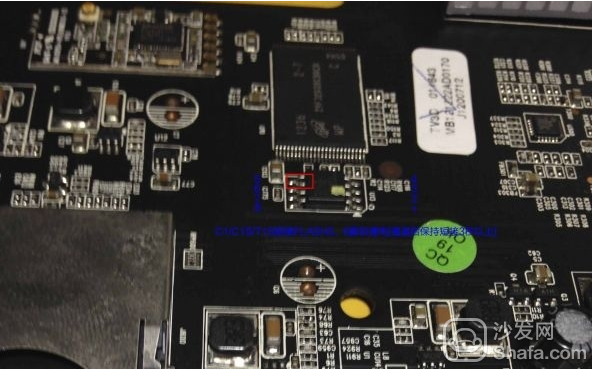
Special Note: Must be optimistic about which of the two short pins, the picture has been marked, do not short the error! Otherwise, only the factory is returned! ! !
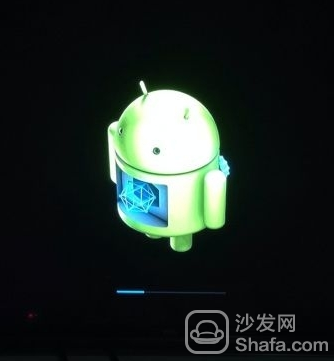
2. The system automatically reads and enters the SD card for recovery mode. See the figure below and restart the brushing machine.
After successfully saving the bricks, you can continue to brush other firmware that you want to brush on UI2.3 and above, including God Blue's personal test firmware, but you must pay attention to the brush points. Tip: If you fail to save the bricks or do not see the robot, please check whether the boot card is made successfully, whether the 3 files of the saved brick are copied to the SD card, and whether the SD is inserted in place. It must be emphasized that the key steps of the strong brush must be correct, that is short-circuited with the metal object as shown in the FLASH 5,6 pin, and then the box is powered on 3-5 seconds after the short-circuit metal objects Take it away, and enter the save brick mode when the robot appears.
Friendship Tip: If you are directly from the V37, V39 brush blue God personal test firmware package caused by the Ding Le LOGO or progress bar seconds to go, etc., please try to brush the official V054 firmware, there may be a miracle; If the fault still looks down.
Strong brush mode
1. Turn the music box off and unplug the power cord behind the box.
2. Then insert the U disk.
3. Hold down the power button for a long time and connect the power supply to the LeEr box with the other hand. When you see "Upgrade, do not power off," you can let go and wait for the brush machine to finish.
Do not power off during the upgrade. After the upgrade is complete, restart the desktop. You need to wait for a while to complete the initialization.
Brush Pack download address: music box C1s
Short recovery mode Â
Tutorial (Please carefully look at each step)
First, use the SD card (the SD card must be used) to create the boot card tool, and load the Bin file to make the SD card system disk.
Tip: The startup disk creation file must be in the same directory as u-boot.bin, otherwise the production will not be successful.
Instructions for use of this tool:
1. Prepare an SD card that will be used as a boot card and connect it to your computer with a card reader.
2. The boot disk creation tool SDcardMaker and u-boot.bin are placed in the same directory on the computer disk (put the computer system D disk, etc.). Run this tool SDcardMaker .
3. Select the disk you want to make the boot card in the drop-down box for "Select Disk". (If the drop-down list is empty, check if the removable disk has displayed the drive letter in "My Computer". If there is a drive letter, close this tool and run this tool again). See below
4. In the “Does Repartition and Format?†item, select “Yes†to repartition the corresponding disk. The default is U-BOOT, and other information reserves 16M disk space, and all remaining disks Space is divided into a zone, and the partition is formatted by calling the windows format window; then open and select the bin file. See below
5, click on the production start card, you need to format the SD card, follow the prompts.
Start formatting SD boot card production completed
Second, then the factory_update_param.aml, recovery.img, update.zip 3 files, copied to the boot card to create a good root directory.
Third, brush machine method:
1, short circuit (shorted) and power (short circuit 5 seconds)
Tip: short circuit with the metal object as shown in the FLASH 5,6 pin, and then power on the box 3-5 seconds, in the short-circuited metal objects away, when the robot appears to enter the save brick mode.
Short-circuit icon
Short-circuit as shown Short-circuit the red dot as shown Special Note: Must be optimistic about which of the two short pins, the picture has been marked, do not short the error! Otherwise, only the factory is returned! ! !
2. The system automatically reads and enters the SD card for recovery mode. See the figure below and restart the brushing machine.
After successfully saving the bricks, you can continue to brush other firmware that you want to brush on UI2.3 and above, including God Blue's personal test firmware, but you must pay attention to the brush points. Tip: If you fail to save the bricks or do not see the robot, please check whether the boot card is made successfully, whether the 3 files of the saved brick are copied to the SD card, and whether the SD is inserted in place. It must be emphasized that the key steps of the strong brush must be correct, that is short-circuited with the metal object as shown in the FLASH 5,6 pin, and then the box is powered on 3-5 seconds after the short-circuit metal objects Take it away, and enter the save brick mode when the robot appears.